Cutting Instructions in Garment Manufacturing: Impact on Cost, Fabric Use, and Quality
In the fashion industry, precise cutting instructions play a critical role in determining the cost-efficiency, fabric utilization, and quality of a finished garment. Whether you’re working with printed fabrics, plaid designs, or solid textiles, understanding the strategic layout of pattern pieces can help reduce material waste and improve consistency in production.
📐 What Are Cutting Instructions?
Cutting instructions refer to the technical guidelines that define how pattern pieces should be laid out and cut from fabric. These instructions include:
- The direction of pattern placement (one-way vs. two-way)
- The alignment of checks or plaids
- Margins for fabric relaxation and shrinkage
- Orientation based on nap, grainline, or design motifs
Cutting instructions are typically provided in the process sheet and must be followed precisely to ensure both aesthetic and technical quality.
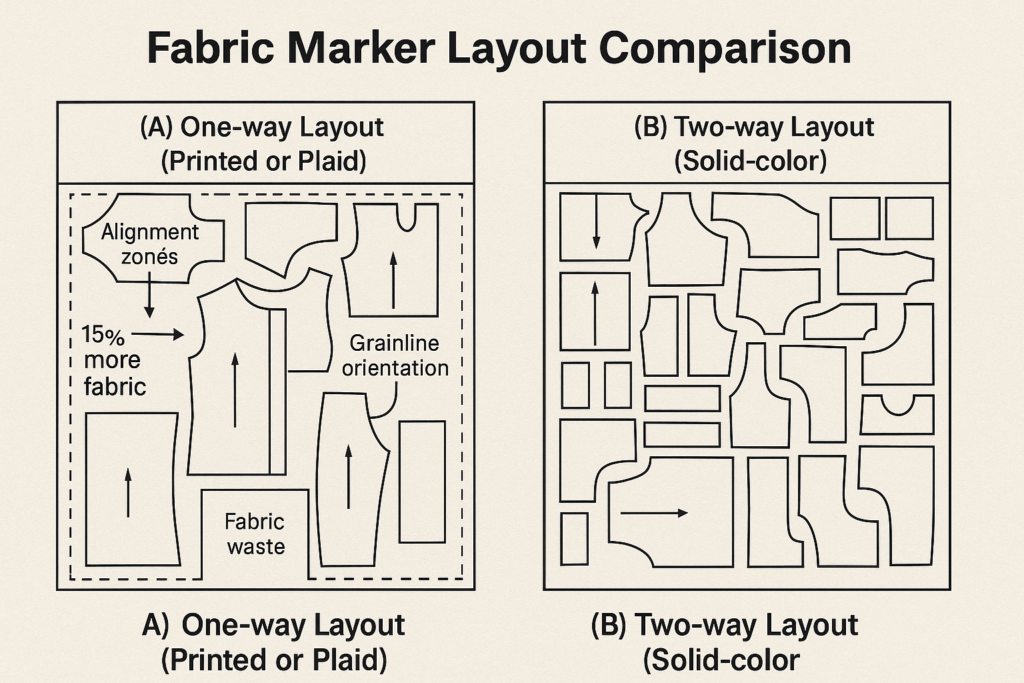
🔁 One-Way vs. Two-Way Marker Layout
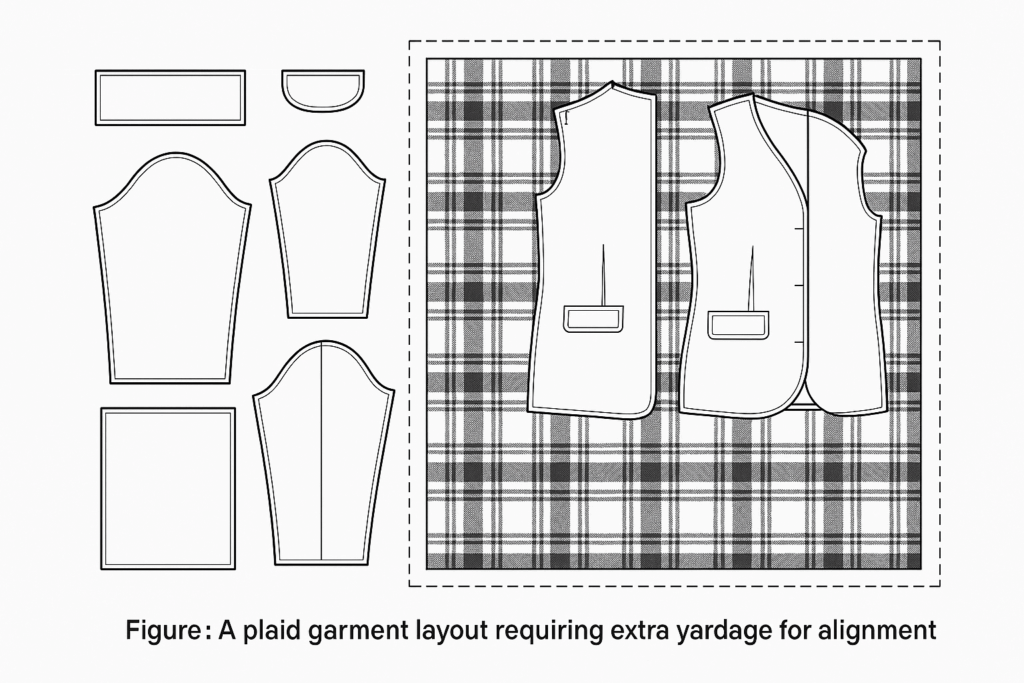
In the examples shown in Figure, all pattern pieces are laid out in a single direction, which is necessary for:
- Printed fabrics
- Plaids with directionality
This one-way marker layout typically consumes 15% more fabric than a two-way marker layout. That additional yardage translates directly into higher production costs, especially for high-value fabrics like silks or wool blends.
📊 Fabric Costing and Layout Comparison
Figure 7.20 compares two real-life mini-marker layouts:
- Figure a: A plaid garment layout requiring extra yardage for alignment.
- Figure b: A solid-colored fabric layout with tighter spacing and lower waste.
The difference in yardage becomes even more substantial when the cost per yard is high. Large check patterns further increase the fabric required to match across seams.
🎯 Importance of Alignment Points
Design decisions—like whether to align checks across side seams, sleeve seams, or darts—affect both the aesthetic appeal and the cost of production.
For example:
- Aligning checks at side seams is more expensive but visually cleaner.
- Misaligned checks may be acceptable for budget garments but not for premium styles.
📌 Key Alignment Examples:
- Horizontal match across front panels or darts
- Alignment from sleeves to bodice
- Matching at lapels, pockets, and hems
💻 Digital Pattern Making and Fabric Efficiency
Modern CAD systems like Gerber AccuMark or Lectra can optimize marker layouts electronically. These systems highlight areas where:
- Smaller pieces can fit around larger ones
- Tight marker layouts can save up to 10%–15% of fabric
- Pattern repeats and check alignment are accounted for in real-time
For example, a dense layout on a plain fabric (with no directional pattern) allows two-way cutting, where pieces can be flipped or mirrored. This reduces fabric waste and significantly lowers cost.
🧵 Bidirectional Cutting: When It’s Possible
Bidirectional cutting works best with:
- Solid-color fabrics
- Non-nap, non-patterned materials
- Small pattern pieces that don’t require alignment
However, fabric grainline and shrinkage control must still be respected to avoid garment distortion.
📈 Summary Table: Cutting Instruction Impact
| Factor | One-Way Layout | Two-Way Layout |
|---|---|---|
| Fabric Usage | Higher (↑15% or more) | Lower |
| Design Flexibility | Required for directional | More flexible |
| Pattern Alignment | Essential | Optional |
| Ideal for | Prints, Plaids | Solids, Naps not required |
| Cost Efficiency | Lower | Higher |
✅ Conclusion: Strategic Cutting Instructions Boost Profitability
Following detailed cutting instructions—from marker planning to alignment strategy—not only enhances garment appearance but also ensures cost-effective production. As fabrics vary in weight, print, and pattern, proper marker planning becomes a vital part of every fashion brand’s success.