Sewing Method: A Detailed Guide to Garment Production
The Sewing Method section of the process sheet is one of the most crucial components in ensuring that a garment is made according to the designer’s vision and specifications. This section provides a step-by-step breakdown of the garment’s production process, outlining the exact sewing techniques, machinery, and tools that should be used. By clearly defining the sewing methods, this section ensures that every garment is produced accurately, with the right stitching and finishing, whether the garment requires hand-stitching, machine stitching, or other specialized techniques.
Purpose of the Sewing Method Section
The Sewing Method section serves several important purposes:
- Clarifies Production Process: It details the specific steps in the sewing process, ensuring the garment is assembled in the correct order.
- Ensures Consistency: By specifying which sewing techniques and machinery to use, this section ensures that each garment is produced with the same quality and precision, whether it’s the first sample or a large production run.
- Improves Efficiency: Clear instructions help manufacturers work faster and more efficiently, reducing errors and the need for revisions.
- Achieves Desired Finish: Whether the garment calls for delicate hand-stitching or robust machine stitching, the right techniques are specified to achieve the desired look and durability.
Key Elements Included in the Sewing Method Section
Step-by-Step Production Process
- The Sewing Method section should break down the entire garment production process into specific steps. This is a critical guide that helps ensure the garment is assembled correctly from start to finish.
Typical steps in the sewing process include:
- Fabric Preparation: Cutting the fabric pieces according to the pattern, preparing the lining, and ensuring the fabric is pre-washed or treated as necessary (for shrinkage or color-fastness).
- Assembly: Starting with key components such as the bodice, sleeves, or pants legs and joining them with specific stitching techniques.
- Joining Seams: The process includes stitching the main seams (side seams, shoulder seams, etc.), using the appropriate stitch type based on the garment’s fabric and intended fit.
- Attaching Trims and Details: This includes the application of labels, zippers, buttons, and other decorative or functional trims.
- Hemming and Finishing: The final steps of hemming and finishing any raw edges, including topstitching, overlocking, or binding, to ensure the garment has a professional finish.
By breaking down the process into these individual steps, manufacturers can better understand how to assemble the garment efficiently and accurately.
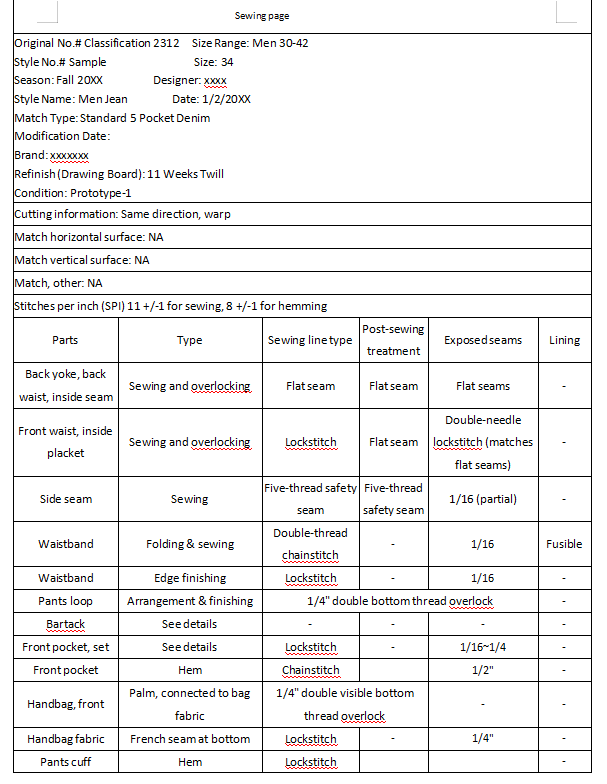
Stitch Types and Techniques
- Stitching is a fundamental part of garment construction. The Sewing Method section specifies the type of stitches that should be used at different points in the garment. The correct stitch type ensures that the garment has the desired strength, flexibility, and appearance.
Common stitch types include:
- Straight Stitch: The most basic stitch, used for most seams. It’s strong and suitable for most fabrics.
- Zigzag Stitch: Often used for stretch fabrics or to prevent fabric edges from fraying.
- Overlock Stitch (Serger Stitch): Typically used to finish the edges of fabrics and prevent them from unraveling.
- Double-Needle Stitch: Used for hems or topstitching where you want a parallel line of stitching for strength and a polished look.
- Blind Hem Stitch: Used for hemming garments without visible stitching, often used in formal or tailored garments.
- Decorative Stitches: Such as embroidery, piping, or topstitching, which may be used for design accents or structural reinforcement.
Example Stitching Instruction:
- Side Seams: Use a straight stitch (stitch length 2.5mm) with a 1/4-inch seam allowance.
- Hems: Use a double-needle stitch with a 3mm distance between needles for a professional finish.
- Armhole Edging: Finish with an overlock stitch to prevent fraying.
Specifying the correct stitch types ensures the manufacturer uses the appropriate techniques for durability, appearance, and functionality.
Machinery and Equipment
- Different types of machinery are used for specific sewing tasks, and it’s important that the Sewing Method section specifies the appropriate machinery to use for each step of the production process.
Common types of machinery used in garment production:
- Flatbed Sewing Machine: Used for general straight or zigzag stitching on flat pieces of fabric.
- Overlock (Serger) Machine: Used to finish raw edges of the fabric, especially for stretch fabrics, to prevent fraying.
- Bar Tack Machine: Used to reinforce areas of stress, such as buttonholes or pocket openings, where extra durability is needed.
- Buttonhole Machine: Used to create consistent and high-quality buttonholes.
- Coverstitch Machine: Used for hemming stretch fabrics and creating professional-looking finishes on knitwear and activewear.
- Embroidery Machine: Used for creating intricate embroidery patterns, logos, or decorative elements on garments.
Example Equipment Instruction:
- Side Seams: Use a flatbed sewing machine with a straight stitch and a 1/4-inch seam allowance.
- Hemming: Use a coverstitch machine for hemming knit fabrics with a double-needle finish.
- Reinforcing Stress Areas: Use a bar tack machine to reinforce pocket openings and zippers.
Specifying the correct machinery ensures that each sewing task is completed efficiently and with the appropriate equipment for the fabric type and design.
Specialized Sewing Methods
- In some cases, garments may require specialized sewing methods to achieve a specific design feature, finish, or structural integrity. These techniques might involve hand-sewing, machine sewing with special needles, or other methods that go beyond standard stitching.
Examples of specialized sewing methods include:
- Hand-Sewing: Some garments, particularly high-end or delicate pieces, may require hand-stitching for certain parts, such as attaching a collar, creating a bespoke hem, or adding decorative elements.
- French Seams: A type of seam where the raw edges are enclosed, giving a clean finish on both the inside and outside of the garment. This is often used for fine fabrics like silk or for garments where the interior will be visible.
- Flat-Felled Seams: A strong, durable seam often used in jeans and heavy garments where both sides of the seam are encased in a double-stitched seam.
- Topstitching: A decorative stitch applied on the outside of the garment, often used for added strength and visual detail, especially around necklines, hems, and pockets.
Example Specialized Sewing Instruction:
- Collar Attachment: Use hand-stitching to attach the collar, ensuring precision and a clean finish.
- French Seams: Use a flatbed sewing machine to create French seams on all internal seams to ensure a clean, neat finish on the inside of the garment.
Specialized methods often give the garment a unique look or structure, contributing to its high-quality finish.
Finishing and Quality Control
- The Sewing Method section should also specify how to finish the garment after the sewing process. Proper finishing ensures that the garment meets the designer’s standards for quality and durability.
Common finishing steps include:
- Pressing: Garments should be pressed after stitching to ensure that the seams lie flat and the fabric has a polished appearance.
- Trimming: Excess fabric and thread should be trimmed to remove any loose edges or stray threads, giving the garment a clean finish.
- Topstitching or Edging: Any raw edges or exposed seams should be finished with topstitching, binding, or serging to prevent fraying and ensure the garment lasts longer.
Example Finishing Instructions:
- Pressing: Press all seams open after stitching and give the final garment a professional press before packaging.
- Thread Trimming: Trim all excess threads and use a fabric-safe adhesive to secure the thread ends at stress points.
Proper finishing ensures the garment looks polished, meets quality standards, and performs well over time.