Measure Garment Step
The Importance of Accurate Prototype Measurement
When measuring a garment prototype, it’s essential to avoid any stretching or other errors that could distort the true fit. This is especially critical for knitted garments, which are prone to stretching both during and after wear. Since knitted fabrics are flexible, the size of the garment can change significantly, potentially affecting fit and proportions. For this reason, accurate pre-evaluation measurements are critical for verifying size and ensuring that the garment will fit as expected after production.
Carefully measuring the prototype not only checks whether the tape and measurement rules are correct but also serves as a chance to review the overall appearance and check the sewing quality. The first prototype will often require modifications to meet the designer’s vision and the manufacturer’s standards. This step is essential in identifying whether the factory is interpreting the specifications correctly and whether the garment meets the desired size, fit, and quality.
Preparation for Measurement: Setting Up the Prototype
Before beginning the measurement process, it’s important to set up the garment correctly. Follow these best practices:
1. Lay the Garment Flat
- Surface Requirements: Lay the garment flat on a smooth, flat surface—such as a well-adjusted table. Ensure that the fabric is smooth and free of wrinkles, and that it is not stretched or pulled.
- Avoid Stretching: Make sure not to stretch the garment during measurement. Simply pat the garment flat to remove wrinkles, without pulling the fabric. Stretching or pulling can cause inaccurate measurements, especially for knitted fabrics, which are elastic and can change dimensions with tension.
2. Align the Garment Properly
- For tops and garments with side seams, smooth the side seams to ensure that they are in line and that the shoulder point marking is accurate. The shoulder point is the location where the garment naturally folds when aligned correctly. Pin or mark this point to use as a reference for subsequent measurements.
Measurement Steps: Best Practices for Accurate Results
1. Start with the Tape Measure
- Begin by positioning the tape measure at the starting point of the measurement. Hold it firmly and extend it along the garment to the end point, ensuring that it’s measured straight and not skewed.
- As you measure, press the tape measure at intervals to keep it in place. After reaching the end, ensure the measurement is taken accurately to the nearest 1/8 inch.
- Note the Sample Size: Write down the measurement on the evaluation form using a pencil for easy adjustments if needed later.
2. Measure Key Points on the Garment
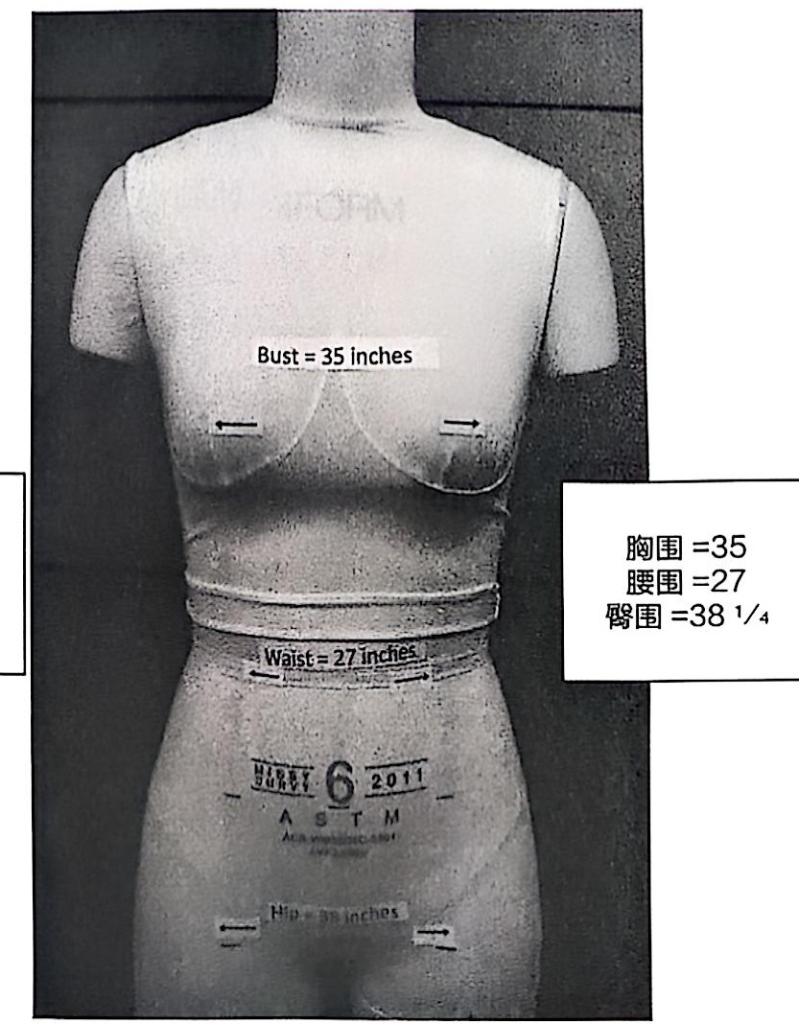
- Measurement Points (POM): All critical points on the garment, such as bust, waist, and inseam, should be measured and recorded. Be sure that the measurement points are clearly marked, and communicate these points to the manufacturer.
3. Ensure the Factory Understands the Measurement Process
- The factory should also understand the specific measurement points and how to take them. For instance, if measuring from the shoulder height point minus the front collar, it’s essential to clarify whether the seam edge or garment edge should be measured.
4. Cross-check Sample Data with Factory Data
- After measuring, compare your measurements with those provided by the factory. For example, if the collar width specification is listed as 7 inches but the sample measures 8 inches, this discrepancy may indicate an issue with measurement start and end points. Address any discrepancies to ensure accurate sizing for future samples.
Special Considerations for Measuring Different Garment Features
1. Sleeves and Trouser Seams
- For tops, measure only one sleeve (as the second sleeve is assumed to be the same).
- For pants, measure just one trouser seam. This avoids unnecessary repetition and speeds up the process.
2. Curved Seams and Hems
- When measuring curved seams (like armholes, necklines, and waistlines), be sure to move the tape measure along the curve without stretching it. The curve should naturally follow the pattern’s intended shape.
3. Using L-Shaped Right-Angle Ruler
- For right-angle measurements, such as armhole and shoulder drop, use an L-shaped square ruler to measure these dimensions accurately. An L-shaped right-angle ruler ensures that measurements are taken precisely, especially for areas that need to maintain a consistent drop or fit.
4. Girth Measurements for Knitted Garments
- Girth measurements refer to the circumference of a garment, which is especially important for knitted garments. For these types of garments, use a half-measure ruler (which doubles the size) or calculate the circumference using a standard method and record it accurately.
- Measuring Knitwear: When measuring knitwear, it is customary to measure half the width of the garment at key points, like the chest, waist, and hips. This method ensures accuracy for both men’s, women’s, and children’s clothing.
Additional Techniques for Stretch Garments
1. Stretchable Fabrics (Elastic Cuffs, Sweaters)
- For elastic cuffs or garments with stretchy fabrics like sweaters, measure the garment without pulling the elastic out of shape. To get an accurate measurement, measure from left to right while the fabric is not stretched.
2. Minimum Stretch Measurements
- Necklines (especially for T-shirts) require a specific measurement of the minimum stretch size. This refers to measuring the neckline while fully stretched, but without damaging the fabric or seams. This measurement ensures that the garment can comfortably stretch over a head without compromising fit.
The Importance of Accurate Measurement in Garment Production
Accurate and consistent measurements are essential to achieving the correct fit and ensuring that the garment meets both the design specifications and consumer expectations. Whether it’s a simple t-shirt or a more complex jacket, proper measurement ensures that each garment will fit as intended, look great, and function correctly.
The fitting record—which includes all measured data and any adjustments made—should be thoroughly documented for reference. This ensures that any necessary changes can be made in future samples and production runs. It also ensures that all parties involved—designers, manufacturers, and quality assurance teams—are aligned on the garment’s final specifications.