Front and Back Views: Essential Elements for Garment Production
The front and back views of a garment are crucial components of the process sheet. These visual representations offer a clear, comprehensive guide to how the garment should appear from both the front and back perspectives. Not only do these sketches serve as the foundation for understanding the overall silhouette of the garment, but they also provide manufacturers with critical information about the construction, fit, and design details.
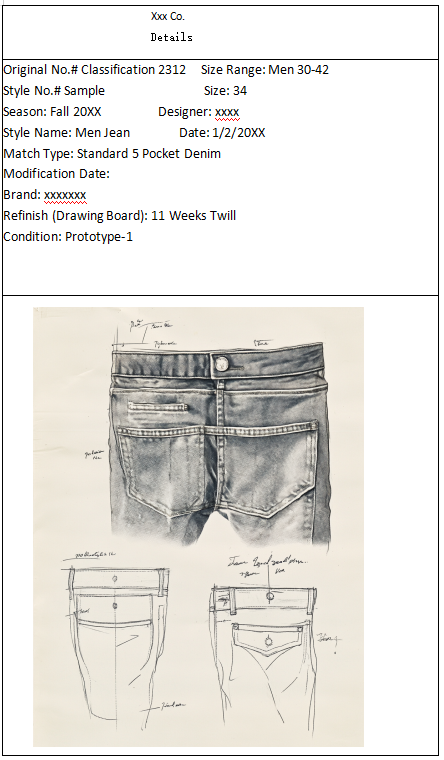
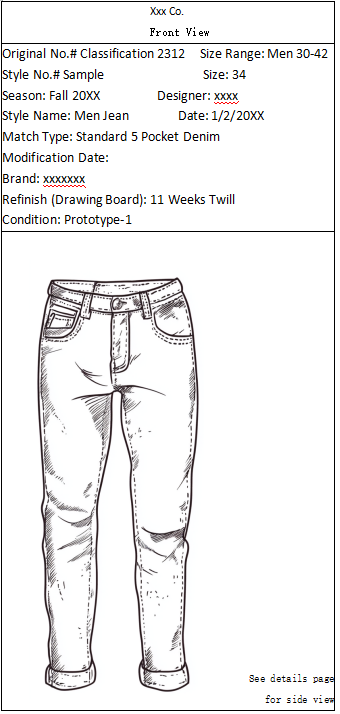
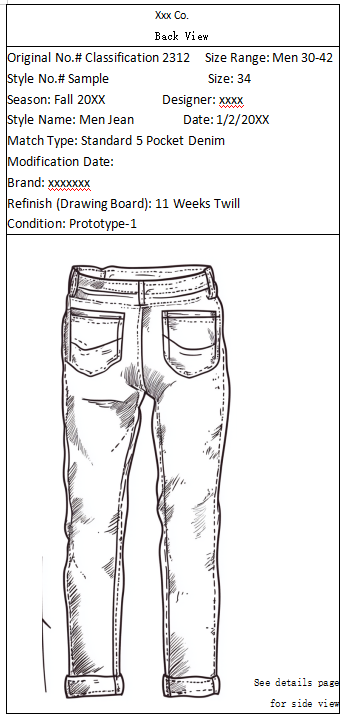
Examples of front and back views in the process sheet
1. Purpose of Front and Back Views in the Process Sheet
The front and back views are intended to communicate the key design elements of the garment to the manufacturer. These drawings serve as a visual blueprint, enabling manufacturers to understand how the garment is structured and ensuring they can accurately replicate the designer’s vision. By offering a comprehensive view of the garment from both angles, these sketches prevent miscommunication and reduce the chances of production errors.
2. Key Elements Depicted in the Front and Back Views
a. Silhouette and Overall Shape
- The silhouette is one of the most important aspects of garment design, and the front and back views help to clearly define it. The overall shape of the garment—whether it’s an A-line, shift, bodycon, or any other style—should be evident in these views.
- The sketches help the manufacturer understand how the garment should fall on the body, the positioning of seams, and whether the design has any special features like pleats, tucks, or darts that influence the fit and shape.
b. Neckline and Collar Design
- The neckline is one of the first things a designer typically considers, and the front view will highlight its shape and depth (e.g., round, V-neck, square, scoop, etc.).
- Any collars, such as a standing collar, notched collar, or mandarin collar, will also be clearly illustrated. These are important details to communicate, as the collar’s construction requires careful attention to ensure the garment’s overall style.
c. Sleeves and Armholes
- The front and back views show the garment’s sleeves (if applicable), specifying whether they are short, long, or 3/4 length, and whether they have additional features like cuffs, pleats, or puffed designs.
- The armhole construction (whether it’s set-in, raglan, dolman, etc.) is also depicted to give the manufacturer clear instructions on how to assemble this critical part of the garment.
d. Pockets and Other Functional Details
- The inclusion and design of pockets should be clearly marked in both the front and back views. Whether it’s a welt pocket, patch pocket, or side seam pocket, the exact positioning and size must be indicated to ensure accurate placement.
- Other functional elements, such as zippers, buttons, or snaps, are also clearly marked. For example, the process sheet might specify the type of zipper to be used, whether it’s a hidden zipper, exposed zipper, or decorative zipper.
e. Seams and Stitching
- The front and back views will clearly outline any seams that play a significant role in the garment’s structure, such as princess seams, side seams, or back darts. These seams should be carefully noted, as they contribute to the garment’s overall fit.
- Any specific stitching patterns (e.g., topstitching, double stitching, or decorative stitching) should be highlighted. This ensures the manufacturer understands the type of finish required to match the designer’s vision.
f. Trims and Decorative Elements
- If the garment features any decorative trims, such as lace, ruffles, piping, or embroidery, these elements should be visible in the sketches.
- Any appliqué or print placement (such as logos or patterns) is also shown in the front and back views to ensure correct positioning and consistency.
g. Zippers, Fasteners, and Closures
- The process sheet should specify the placement and type of fastenings such as buttons, zippers, hooks, or ties. The front and back views make it easy to illustrate where these fasteners should be placed, ensuring proper functionality and aesthetic balance.
- For example, a front view might show a button-down shirt with the buttons clearly placed in the center of the garment, while the back view would display how the buttons align with the back seams.
h. Hems and Finishes
- The details of hems and finishes should also be communicated through the front and back views. Whether the garment has a clean finish, a rolled hem, or a cuff, this information needs to be clearly marked.
- Any special finishing techniques, such as raw edges or bias-bound hems, should be indicated in the drawings to give clear guidelines for the construction process.
3. Benefits of Including Clear Front and Back Views in the Process Sheet
a. Accurate Replication of the Design
- Clear and detailed front and back views make it easier for manufacturers to replicate the garment as designed. These visuals reduce ambiguity and ensure that the garment produced matches the designer’s specifications closely.
b. Visual Representation of Fit
- The garment’s fit is one of the most critical aspects of the design process. The front and back views provide a visual representation of how the garment should fit, allowing manufacturers to adjust their construction methods if necessary to achieve the desired fit.
c. Simplified Communication Between Designers and Manufacturers
- Visual sketches break down the communication barriers between designers and manufacturers who may speak different languages or use different terminology. By providing a visual reference, the process sheet makes it much easier to convey intricate design details.
d. Prevents Production Errors
- With a clear and accurate depiction of the front and back views, manufacturers are less likely to misinterpret design elements, which minimizes production errors. This is especially important in the garment production industry, where even small mistakes can result in costly delays or returns.
e. Consistency Across Production Runs
- For garments that will go into mass production or require several sample iterations, the front and back views help maintain consistency across multiple production runs. As the manufacturer works on larger orders, having these views ensures that every piece maintains the same design integrity.
4. Best Practices for Creating Front and Back Views
To ensure the front and back views are as effective as possible, here are some best practices for designers:
- Use Consistent Proportions and Scale: Ensure the proportions of the garment are accurate, and maintain a consistent scale between the front and back views.
- Label Key Design Features: Label the key design features in the drawings, such as pockets, zippers, and stitching, to provide clarity for the manufacturer.
- Highlight Any Special Details: If the garment has special details, such as asymmetric features, unique closures, or intricate embroidery, ensure these are highlighted and easily visible in the sketches.
- Ensure Clarity and Precision: The sketches should be clear and precise, avoiding any unnecessary complexity or ambiguity. Simplicity in communication helps avoid mistakes and confusion.