🧵 Reinforcement Methods for Buttons: Ensuring Durability and Garment Quality
Button reinforcement is a critical quality control step in garment manufacturing. Without proper reinforcement, buttons and buttonholes can cause fabric strain, tearing, and long-term garment damage — especially in high-stress areas like the front placket, collar, and sleeve vent.
For professional garment suppliers and product developers, understanding reinforcement methods is essential to reduce returns, improve durability, and enhance brand reputation.
🔹 Why Button Reinforcement Is Necessary
Buttons create concentrated tension points on fabric. Each time a garment is fastened or unfastened, stress is applied to:
- The fabric surface
- The stitching thread
- The buttonhole edge
- The placket structure
Without reinforcement, this stress may cause:
- ❌ Fabric distortion
- ❌ Tearing around buttonholes
- ❌ Button detachment
- ❌ Reduced garment lifespan
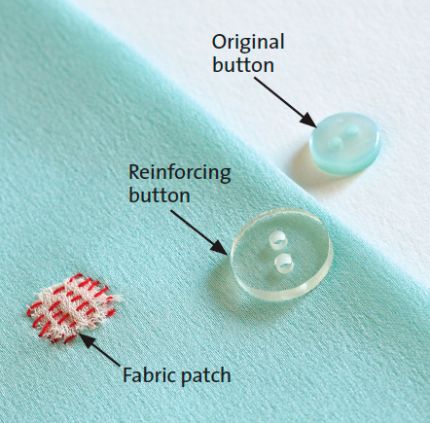
🔸 Basic Reinforcement for Single-Layer Fabrics
For garments made from single-layer fabric, reinforcement is especially important.
✔ Recommended Method:
Place a circular piece of adhesive interfacing or an additional fabric patch beneath the button on the reverse side.
This reinforcement:
- Distributes tension evenly
- Prevents puckering
- Strengthens the button base
- Improves wear resistance
🔹 Reinforcement for Buttonholes
Buttonholes also require structural support, especially in:
- Lightweight woven fabrics
- Stretch fabrics
- Loosely woven materials
Interfacing should be applied:
- Inside the placket
- Along the collar stand (for shirts)
- Behind the buttonhole stitching
🔸 High-Stress Reinforcement Areas
| Garment Area | Reinforcement Type | Purpose |
|---|---|---|
| Front Placket | Fusible interfacing + stay tape | Prevent pulling and distortion |
| Collar Stand | Inner interlining | Support top button tension |
| Sleeve Vent | Small fabric backing patch | Strengthen narrow opening |
| Waistline | Reinforced placket + internal tape | Resist horizontal stress |
| Double-Breasted | Hidden internal button reinforcement | Stabilize overlapping layers |
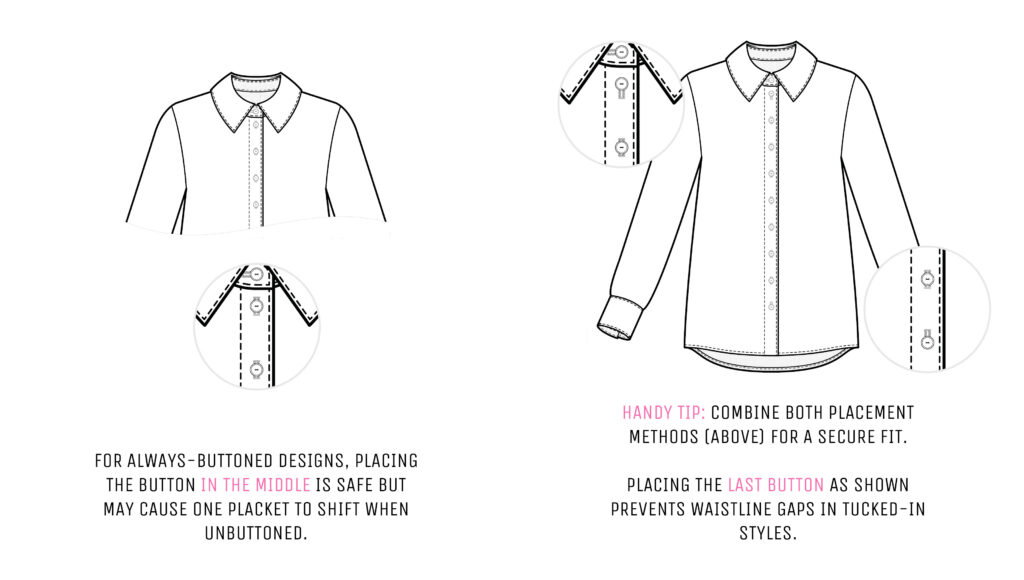
🧵 Shirt-Specific Reinforcement
In shirts:
- Interlining is placed on the inner side of the collar area
- Placket is reinforced with fusible interfacing
- Top button zone receives additional stabilization
This ensures the collar sits smoothly and prevents stretching at the neckline.
🔹 Reinforcement in Product Development
Reinforcement details should be clearly specified in the Bill of Materials (BOM) and technical package.
Example Button Specification Table
| Product Code | Description | Location | Size | Finish | Quantity | MOQ |
|---|---|---|---|---|---|---|
| 878G | Animal Horn Button, 4 Holes | Front Placket (8) | 18L | Matte | 12+1 | 12 Rows |
| 878G | Animal Horn Button, 4 Holes | Sleeve Vent (2) | 14L | Matte | 4+1 | 12 Rows |
📌 Including size, finish, quantity, and reinforcement instructions prevents production errors.
🔸 Adhesive Interfacing: Best Practices
When using fusible interfacing:
- Match weight to fabric thickness
- Avoid over-fusing delicate fabrics
- Use round or square patches depending on stress level
- Test wash durability before bulk production
✅ Quality Control Checklist
Before approving a production sample:
- ✔ Pull-test buttons
- ✔ Inspect reverse side reinforcement
- ✔ Confirm interfacing placement
- ✔ Check placket smoothness
- ✔ Verify collar stabilization
Proper reinforcement is a hallmark of premium garment manufacturing and reduces long-term after-sales issues.